Adding an OptiBay to my MacBook Pro
Well, I finally decided to risk voiding my warranty for the luxury of double the disk space. I have a 160GB hard drive installed in my MacBook, but I’m constantly squeezed for space. I never use my internal CD drive (the last time was over two months ago… and it was actually my house-mate that needed it), so the thought of occasionally using an external CD drive is much more pleasant than lugging an external HD around all the time.
MCE Technologies sells a decent-looking package called OptiBay for a little too much money that takes the internal optical drive and replaces it with a Hard Drive. You can do it on most any Mac laptop. I searched around online quite a bit for reviews and experiences, but it seems as though nobody has done a formal review. So, I figured I’d photograph and document my experience as I went.
I also noticed that the installation guide isn’t available for download, like some are for many other MCE products. So, I quickly photographed the document and converted it to a pdf (I don’t have a scanner easily accessible). It’s rough and ugly, but it should give others a glimpse into the replacement process.
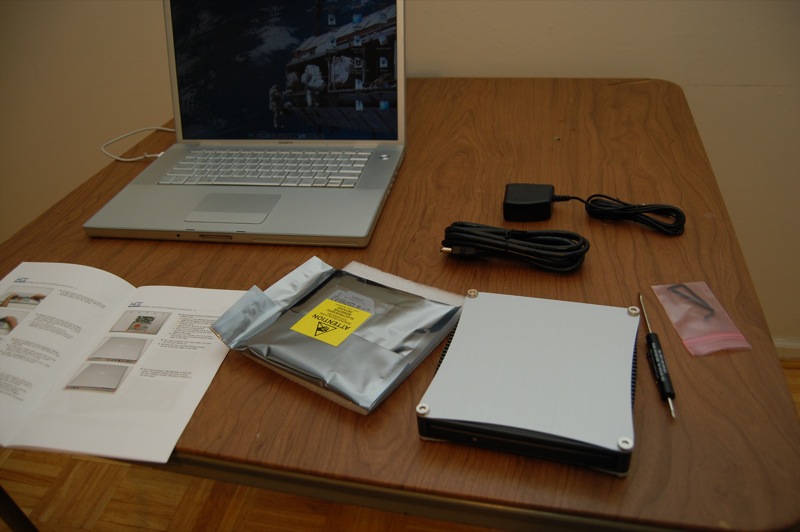
The kit came in a nondescript box, without any mention of the external optical drive that I also had ordered. But, sure enough, below the hard drive kit was the external drive. It’s nice and tiny and can grab power from the bus, but also comes with an AC adapter. The 2.5” hard drives are much smaller than I always imagine. The hard drive kit is simply a plastic assembly with a straight-through PCB connection from PATA to the fancy ribbon cable connector that Apple uses. Strangely enough, they use cheap double-sided foam tape as padding (they even warn you not to remove the paper cover; it’d expose the adhesive!). You’d think that for a $379 piece of equipment they could pony up for some nice professional padding. But, I suppose if it works…
Installation

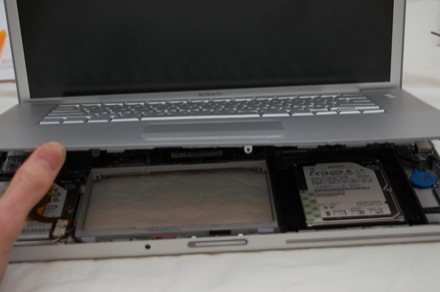
So, I begin following the guide. The first few steps were simple and easy, just removing a bunch of screws (21, to be exact). The kit came with a screwdriver that worked relatively well for the varied sizes, as well as two Torx allens (but I only needed the smaller of the two). Once all the external screws were out, the guide instructed me to “slowly and gently disengage the top case”—the Keyboard/Trackpad/Speaker Grille assembly. “Some firm yet careful lifting will cause [a series of clips in front of the optical drive] to disengage.” Sheesh. I don’t think firm yet careful quite cuts it. I had a hell of a time trying to pop those things out. It’s extraordinarily difficult to get any kind of grip to pry them apart, and my fingernails quickly gave up and broke.
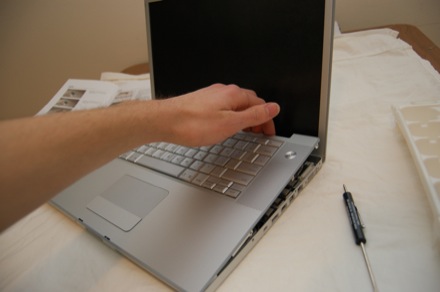
After realizing that the screwdriver was indeed a very bad idea, I found that if I pulled the back out first, I could work my way around with a heavy plastic gift card (thanks B&N) prying the clips apart. I was terrified I would bend the “top case” out of shape as I did this, but even though it contorted further than I would have liked, it settled right back to its original shape. I counted five snaps—four by the optical drive, and one in front of the track pad.

Once that was up, I breathed a sigh of relief. But I still had to disengage the ribbon cable from the motherboard. The instruction manual doesn’t say much about this connector, so I was worried about bending pins as I pried it off. As it turns out, it looks to be rather robust—it is a surface-mount low profile connector that doesn’t have any exposed pins or sockets. The contacts are around the edges of a molded plastic rectangle, fitting flush against a nicely fitting mate. There are no snags or clips. On the second and third times, I realized that there was just enough slack in the ribbon to prop the keyboard up on the display without disconnecting it. Just be careful you don’t knock it over.
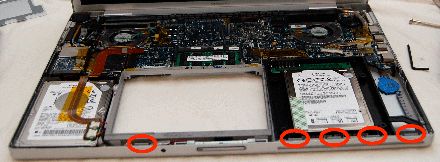
Then, the guide says that there are three screws holding in the optical drive; I counted four, three phillips and one torx. The front two were so small and snugly fit that the supplied screwdriver didn’t quite cut it. I needed to grab my set of jeweler’s drivers and a vice grip to get them out. Watch out for the front left screw – it wants to go chasing after the magnet in the latch once freed.
The ribbon cable on the optical drive uses the same variety of surface-mount connector as the keyboard/trackpad connector did. MCE makes use of this same ribbon cable for its kit. I removed the cable from the motherboard, as the guide recommends, but I realized that if you’re careful, this doesn’t need to come off. That way you could save yourself the delicate procedure of disconnecting and reconnecting it. The kit fit nicely into the vacant space once the drive was gone, but there was a slight wiggle from left to right. I don’t notice it now that it’s all put back together.
So, I carefully replaced the top case, snapping all the clasps shut, and then screwed it all back together. Apple uses a threadlocker on the vast majority of the screws; it would have been nice to have had some lying around to make sure the screws didn’t come loose. In fact, it’d make a lot of sense for MCE to provide it. Oh well.
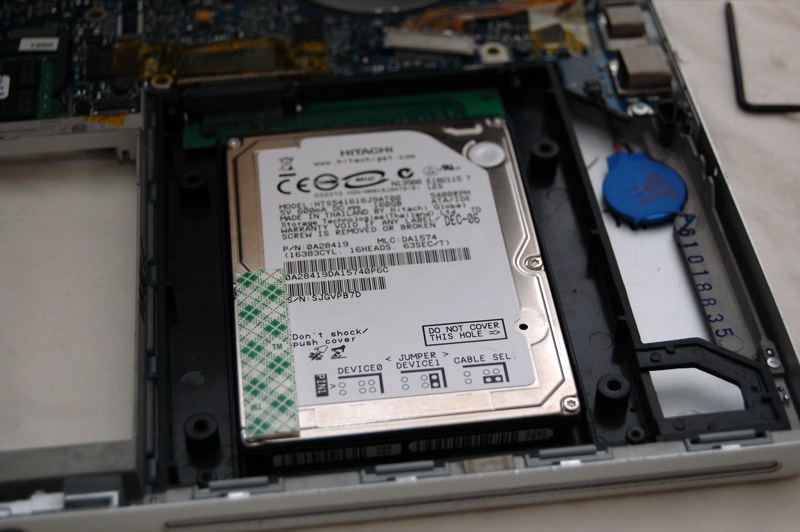
I put everything back together, hold my breath and fire it up. Sure enough, it boots up without a problem (and without the whine of the optical drive checking for a disk!). As soon as I log in, it prompts me to format the new drive. Success (or so I thought). But I couldn’t get Disk utility to format the drive. Argh! It kept reporting an I/O error. Yeach. So, I go through the whole rigamarole again. This time I’m faster (without taking pictures, and I knew what I was doing), but it still took a good half hour just to open everything up again. Those snaps still scare me. I re-seated the ribbon cable on both ends, and tried again. Still no luck—but this time Disk Utility was reporting a corrupt name and 512 TB (yet, Terabytes! If only!). Wild, but it’s probably not a good sign. And formatting, of course, gives the same I/O error. I try once again, and while it reported the right size this time, the name “Hitachi” was still corrupted. Dag nab it. So, I replace the old optical drive back in, close it all back up again, and fire off an email to tech support. What a bust. I voided my MacBook’s warranty just to test the connections of a PCB. What is really disconcerting is that the one of the few mentions I could find had the exact same problem.
MCE did come through in the end, though. They gave me a FedEx account number for me to ship it back to them, and once they got it, they shipped a replacement to me overnight. This one came with a handwritten note, stating that it was tested and works. This time, instead of asking to initialize the drive once the whole installation rigamaroll was over, my laptop recognized the drive as pre-formatted with the name “Optibay 160.” Sweet.
Conclusion
The computer is no worse for the wear (excepting a minor nick where I tried to use a screwdriver to pry snaps open), and I have 320GB where ever I go. While probably not worth all the hassle and effort and voided warranty, it is really nice. I haven’t noticed a difference in my battery life, but it does seem to make a bit more noise. It’s interesting, since it seemed to be the exact same model as the existing drive, but I can definitely hear it spinning much more loudly than the original. I think it’s vibrating and echoing a bit more than the original did since it’s not seated quite as snugly. Transfer speeds are fast between the two hard drives, around 30MB/s. And the external superdrive works well.
Posted by Matt on Saturday, May 26, 2007